Windows 11 introduces the convenient feature of adding network folders or drives as Network Drives, making it easier for users to access shared resources seamlessly. However, once you no longer need these network connections, it’s essential to know how to remove them.
This article guides Windows 11 users through various methods to successfully remove a network drive.
Removing Network Drive from File Explorer
The simplest method to remove a network drive is through File Explorer. Follow these steps:
1. Open File Explorer.
2. Click the three dots button and select “Disconnect Network Drive.”

3. In the “Disconnect Network Drives” window, locate the network drive and select it.
4. Click OK to disconnect.

Alternatively:
1. Open File Explorer.
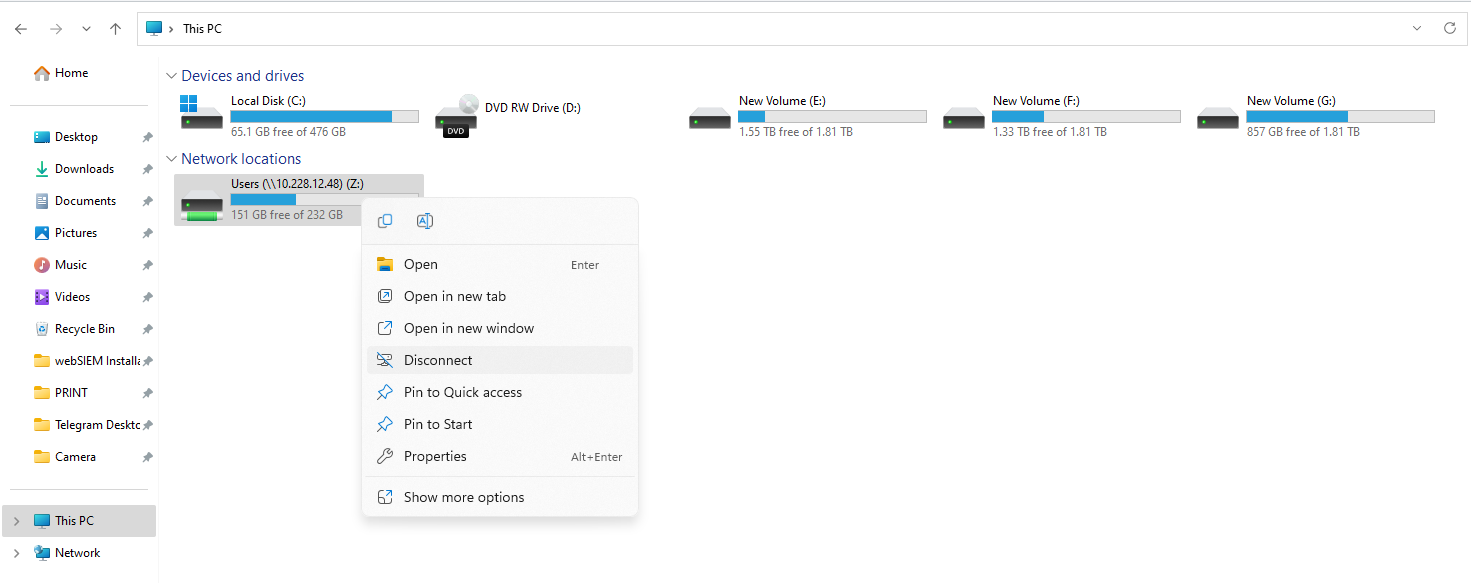
2. Click on Network or This PC.
3. Right-click on the mapped network drive.
4. Click “Show More options” and select Disconnect.
The drive will be successfully removed and won’t appear in This PC.
Removing Network Drive from Command Prompt
Another effective method involves using the Command Prompt or Windows Terminal:
- Go to File Explorer and note down the letter assigned to the drive you want to remove.
- Launch Command Prompt or Windows Terminal with admin privileges (Win + X).
- Type the command: `net use z: /delete` (replace ‘z’ with the drive letter) and press Enter.
- Check File Explorer again; the mapped drive should no longer appear.

Removing Network Drive from Registry
While less common, users can also remove a connected network drive from the registry:
- Press Win + R to open the Run Prompt.
- Type `regedit` and press Shift+Enter to launch the registry editor as an admin.
- Navigate to the path: `##Server_Name#Share_Name`.
- Right-click on the mapped network entry and select delete.
- Confirm deletion by clicking Yes.
After completing these steps, check File Explorer or refresh it to ensure the network drive is no longer visible.
Removing Network Drive by Clearing Mapped Network Drive Cache
Windows 11 maintains a cache for all network drives to ensure quick loading. Clear the cache using the Command Prompt:
- Open Command Prompt.
- Type the command: `net use D: /delete` (replace ‘D’ with the drive letter) and press Enter.
Note: This method may not work for network location mappings like web servers or FTP servers.
Conclusion
Whether you prefer using File Explorer, Command Prompt, or the registry editor, Windows 11 offers multiple methods to remove network drives efficiently. Remember to choose the method that suits your preference and always exercise caution when making changes to the registry.
By following these steps, users can seamlessly manage their network connections and maintain a clutter-free computing environment.


This Post Has One Comment