
NGINX, a powerful web server and reverse proxy server, allows website administrators to configure custom error pages to enhance user experience when a requested URL is not found. Creating a custom 404 page ensures that visitors receive a more user-friendly and informative message when they encounter a page not found error on your website. NGINX makes this process straightforward with the use of the `error_page` directive.
In this guide, we’ll walk through the steps to create a custom 404 page in NGINX.
Step 1: Create the 404 Error Page
Begin by crafting your custom error page. You can use a text editor or popular website builders like Squarespace, WordPress, or Wix to design an appealing and informative HTML page. Save this file as `error404.html` in the root folder of your website. Feel free to choose a different filename if you prefer.
Step 2: Open the NGINX Configuration File
Using a terminal, open the NGINX server configuration file. If you have a separate virtual host configuration for your website, navigate to its configuration file. Here are examples for both scenarios:
For the main NGINX configuration file:
sudo nano /etc/nginx/nginx.confFor a specific virtual host (replace `website.conf` with your actual configuration file):
sudo nano /etc/nginx/sites-enabled/website.confAlternatively, you can edit the default virtual host configuration file:
sudo nano /etc/nginx/sites-enabled/defaultStep 3: Configure the Custom 404 Error Page
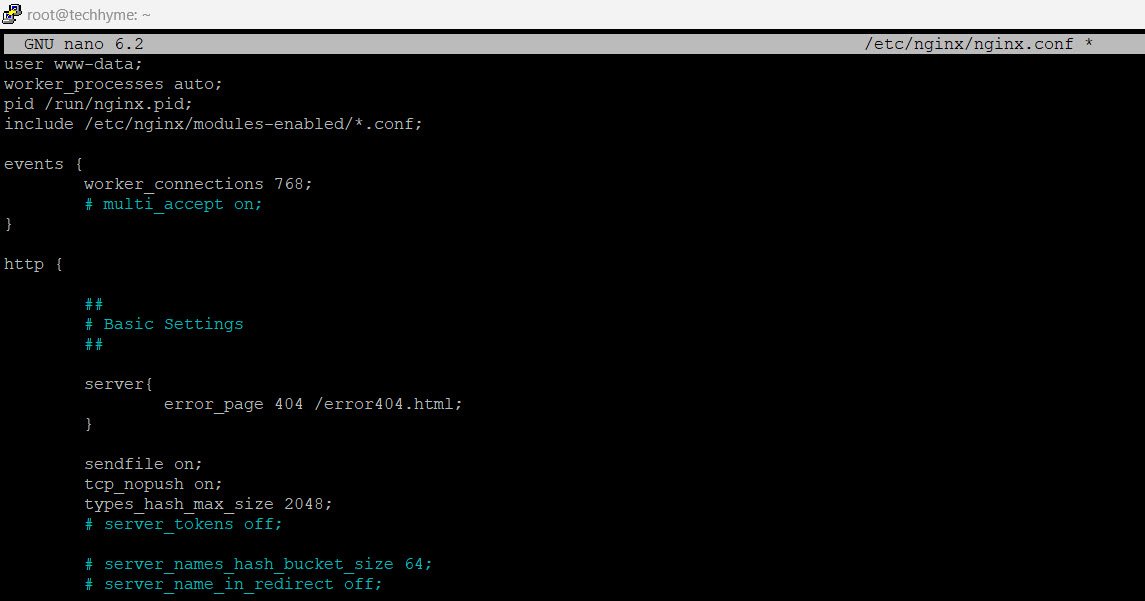
Locate the appropriate `server` block in your NGINX configuration file and add the `error_page` directive to specify the custom error page for the 404 response code. Insert the following line within the `server` block:
server {
  ...
  error_page 404 /error404.html;
  ...
}
With this configuration, NGINX will display the `error404.html` page instead of the default “404: Page not found” error response.
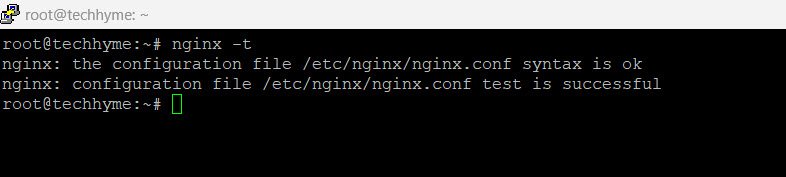
Step 4: Restart the NGINX Server
Before applying the changes, ensure there are no syntax errors in your updated configuration file:
sudo nginx -tIf there are no errors, restart the NGINX server to apply the new configuration:
For Debian/Ubuntu:
sudo service nginx reload
For Red Hat/CentOS:
systemctl restart nginxCongratulations! Your NGINX server is now configured to serve the custom 404 error page. Similarly, you can extend this process to create custom error pages for other HTTP status codes like 403, 500, 502, etc. Adjust the error code number and response URL in the `error_page` directive accordingly.
Enhance your website’s user experience by providing informative and visually appealing error pages tailored to your brand.
You may also like:- How To Install Python 2.7.18 From The Source
- How To Parse SSH Authentication Logs with Logstash
- How To Easily Crack Wi-Fi Password
- 6 Most Useful Windows Command Prompt Commands
- Ripgrep – Searching for Specific File Types and Beyond
- Insert and Create Data in Elasticsearch
- Manage Time and Date in Linux with timedatectl
- How to Set Network Adapter Priority on Windows 11
- How to Add a User to Sudoers on Ubuntu
- 25 Popular Linux IP Command Examples


This Post Has One Comment