
IT security professionals use a lot of tools to keep networks secure. These tools range from go-to utilities that run from the command-line interface of just about every operating system to more complex tools for scanning network activity.
This article covers many of the network related utilities included in Windows and UNIX/Linux systems.
- ping
- ipconfig
- ifconfig
- ip
- arp
- netstat
- netcat
- tracert
- nslookup
- dig
Let’s look at the commands:
1. ping
If you want to know that two TCP/IP systems share the same network, the go-to tool is ping. The ping utility takes advantage of the fact that by design all TCP/IP hosts respond to ICMP requests. When one system successfully pings another host, you automatically know that the other system is connected and is properly IP addressed.
- In Windows, ping runs four times and stops automatically.
- In Linux, ping runs continuously until you press ctrl+c.

To get ping to run continuously in Windows, use the -t switch. The ping utility has uses beyond simply verifying connectivity. Running ping using a DNS name, for example, is a great way to verify you have a good DNS server.

The ping utility offers many more features that IT security professionals use all the time. Here’s a list of some of the more useful switches:
- -a Resolve addresses to hostnames
- -f Set Don’t Fragment flag in packet (IPv4 only)
- -4 Force using IPv4
- -6 Force using IPv6
2. ipconfig
The ipconfig command is the Windows-only reporting utility that shows the current status of the network settings for a host system. Typing ipconfig by itself gives some basic, but important, information.
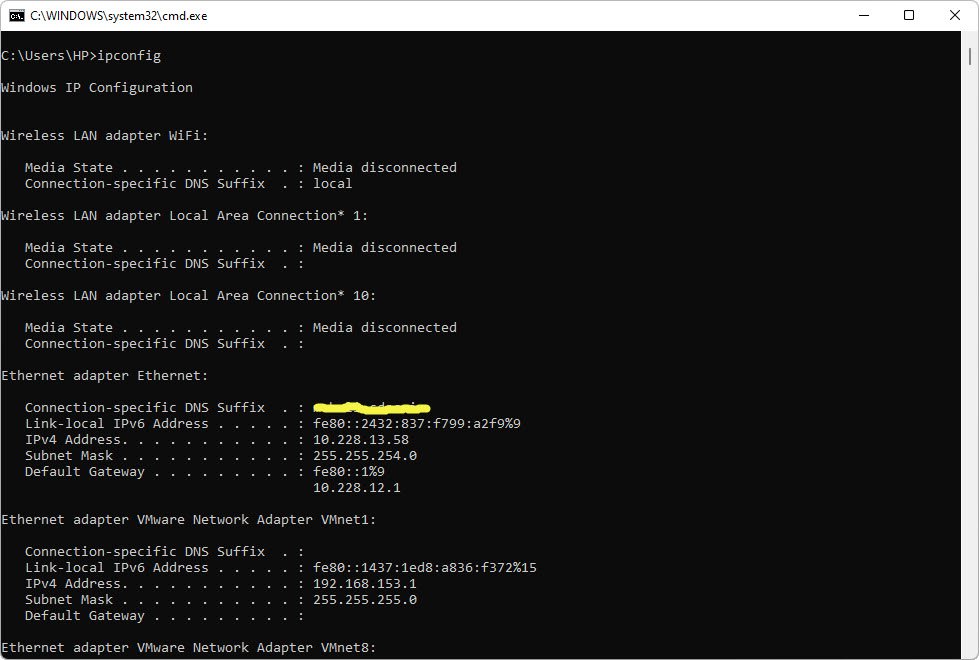
ipconfig has the following six switches that are particularly useful. Typing ipconfig /all, for example, lists virtually every IP and Ethernet setting on the system.
- /all – Exhaustive listing of virtually every IP and Ethernet setting
- /release – Releases the DHCP IP address lease
- /renew – Renews the DHCP IP address lease
- /flushdns – Clears the host’s DNS cache
- /displaydns – Displays the host’s DNS cache
3. ifconfig
The ifconfig command is the functional equivalent to ipconfig for UNIX/Linux operating systems. Unlike ipconfig, ifconfig goes beyond basic reporting, enabling you to configure a system.
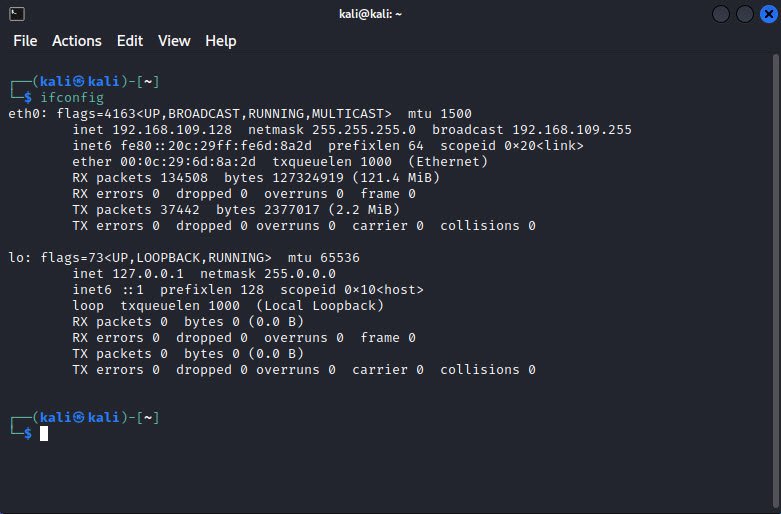
The following example sets the IP address and the subnet mask for the Ethernet NIC eth0:
sudo ifconfig eth0 192.168.0.1 netmask 255.255.255.0

4. ip
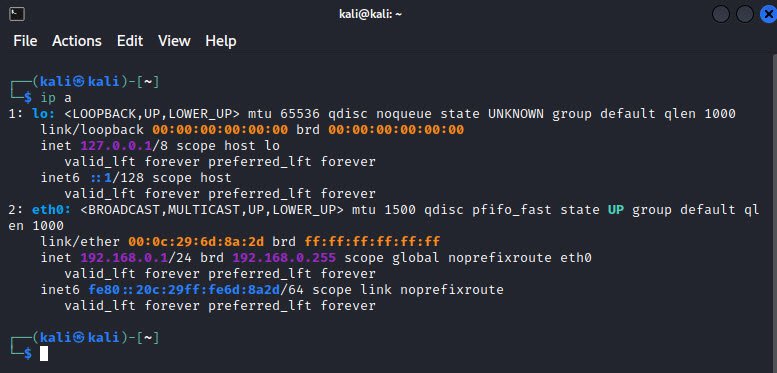
If you’re looking to do anything serious in terms of IP and Ethernet information on a Linux system, the cool kid is the ip command. The ip command replaces ifconfig, doing many of the same tasks, such as viewing IP information on a system, checking status of network connections, managing routing, and starting or stopping an Ethernet interface.
The syntax differs from ipconfig and ifconfig, dropping a lot of the extra non-alphanumeric characters and shortening switch names. To see all the Ethernet and IP information for a system, for example, just type this: ip a
5. arp
Every host on a network keeps a cache of mapped IP-to-Ethernet addresses for the local network. The arp command enables you to observe and administer this cache. Interestingly, both the Windows version and the Linux version use the almost same switches. If you want to see the current cache, type the command as follows (Windows version):

The dynamic type shows a listing under control of DHCP. Static types are fixed (the multicast addresses that start with 224 never change) or are for statically assignedIP addresses.
The arp command enables detection of ARP spoofing, when a separate system uses the arp command to broadcast another host’s IP address.
6. netstat
The netstat command is the go-to tool in Windows and Linux to get any information you might need on the host system’s TCP and UDP connections, status of all open and listening ports, and a few other items such as the host’s routing table.
Typing netstat by itself shows all active connections between a host and other hosts:

You can see that the first few lines of any netstat show a number of active connections with the loopback address (the 127.x.x.x). These are used by Microsoft for several different information exchanges such as the Cortana voice recognition utility.
Other connections show up as more varied IP addresses:
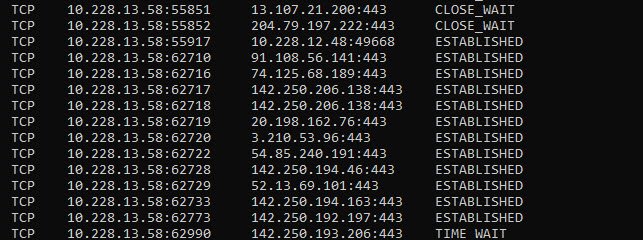
The preceding netstat output shows the open connections on this system, mainly HTTPS connections for Web pages. In the State column on the right, ESTABLISHED identifies active connections and CLOSE_WAIT indicates connections that are closing.
Typing netstat in Linux gives the same information, but in a slightly different format. At the very bottom are the associated UNIX sockets. A socket is an endpoint for connections. This data is very long and not very useful.

Typing netstat -a in Windows or Linux shows the same information as netstat alone, but adds listening ports.
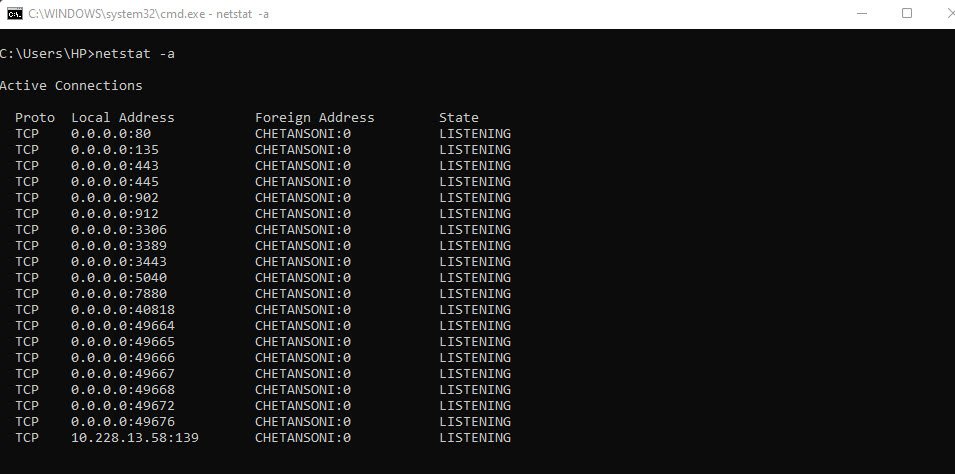
This is a very powerful tool for finding hidden servers or malware on a host. Look carefully at the following command. Running netstat with the -b option displays the executable file making the connection.
Here’s netstat running in Windows PowerShell using both the -b and -a options:

Netstat is an incredibly powerful tool and this short description barely touched its capabilities. For the CompTIA Security+ exam, you should experiment with netstat both in Linux and in Windows.
7. netcat
netcat (or nc) is a terminal program for Linux that enables you to make any type of connection and see the results from a command line. With nc, you can connect to anything on any port number or you can make your system listen on a port number.

The nc command is a primitive tool. To get any good information from the connection, the user must know the protocol well enough to type in properly formed input data. Since this is a Web page, type get index.html HTTP/1.1, as this is what the Web server is expecting.

The challenge and the power of nc come from the fact that it’s a tool for people who know how to type in the right commands, making it great for penetration testing or, if you’re evil, hacking. Imagine making a connection to a server and typing in anything you want to try to fool the server into doing something it’s not supposed to do!
The nc command even works as a handy scanning command. Find a server, guess on a port number, and try connecting! The nc command works perfectly with scripts. It’s relatively easy to write a script that tries 1024 port numbers one after the other, automating the scanning process.
8. tracert
If you want to know how packets get from a host to another endpoint, the best tool is the Windows tracert command. Linux uses the almost identical command called traceroute. Run tracert as follows:

The power of tracert comes by running it before there are any problems. If you look at the previous example, you see the first two hops use a private IP address. This is correct, because this network has two routers between the host and the ISP—in this case, 14.139.X.X.
9. nslookup
The nslookup tool, built into both Windows and Linux, has one function: if you give nslookup a DNS server name or a DNS server’s IP address, nslookup will query that DNS server and (assuming the DNS server is configured to respond) return incredibly detailed information about any DNS domain.
For example, you can run nslookup to ask a DNS server for all the NS (name server) records for any domain.
This power of nslookup has been used for evil purposes. For that reason, no public DNS server supports nslookup anymore for anything but the simplest queries. But there are still good reasons to use nslookup.
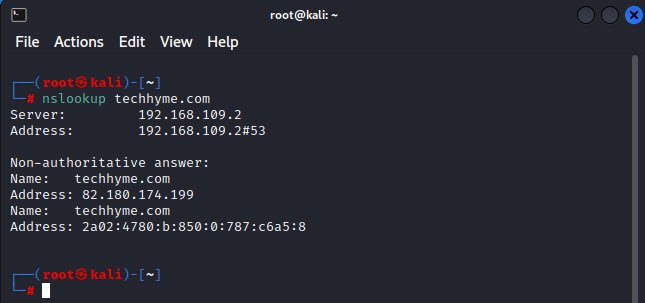
The most basic way to run nslookup is to type the command followed by a domain.

While almost all the features of nslookup no longer work, one feature stands out in that nslookup can tell you if an IP address is a functioning DNS server. Run nslookup interactively by typing nslookup to get a prompt:
Then type in the IP address of the DNS server you want to check:

Note that it returns a DNS name. This means there is a reverse DNS zone; a very good sign, but still not proof.
10. dig
The dig command is a Linux-based DNS querying tool that offers many advantages over nslookup. dig works with the host’s DNS settings, as opposed to nslookup, which ignores the host DNS settings and makes queries based on the variables entered at the command line.
dig also works well with scripting tools. The dig tool is unique to Linux, although you can find third-party Windows dig-like tools. dig is simple to use and provides excellent information with an easy-to-use interface.
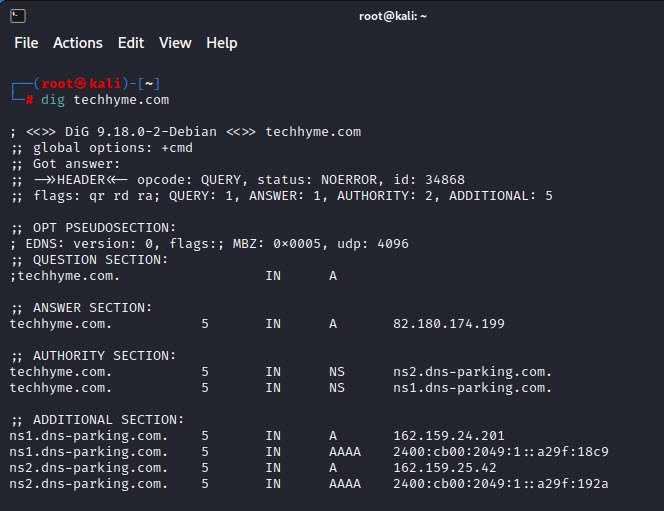
dig has some interesting features that are much easier to use than the same functions in nslookup. For example, if you want to know all the mail server (MX) servers for a domain, just add the MX switch.

- How To Install Python 2.7.18 From The Source
- How To Parse SSH Authentication Logs with Logstash
- How To Easily Crack Wi-Fi Password
- 6 Most Useful Windows Command Prompt Commands
- Ripgrep – Searching for Specific File Types and Beyond
- Insert and Create Data in Elasticsearch
- Manage Time and Date in Linux with timedatectl
- How to Set Network Adapter Priority on Windows 11
- How to Add a User to Sudoers on Ubuntu
- 25 Popular Linux IP Command Examples


